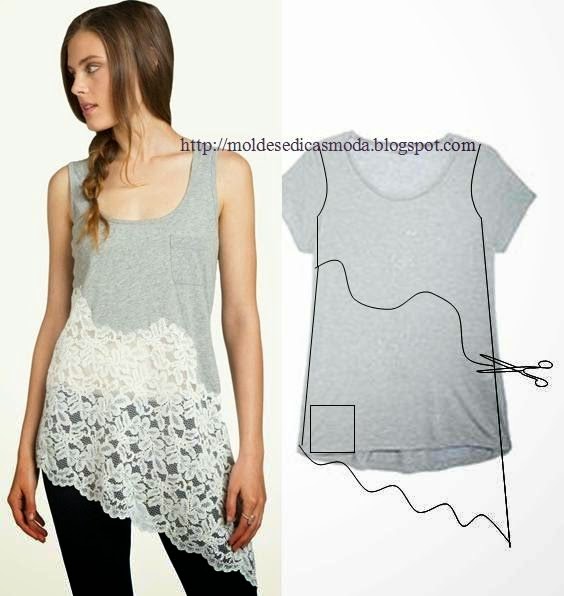
When the Butterick 6142 pattern was released, it reminded me of this top I'd pinned to one of my boards on Pinterest:
![]()
At the time I started working on the pants, I thought I would get both pieces finished prior to Christmas week, well that didn't happen! As you can see since it's the middle of February! *LOL* When I finally cut the pattern pieces out I changed a few of my original ideas for this outfit. Some were design changes and some were added after the top was a little too tight.
Here's my finished garment:
![]()
Pattern Alterations Design Changes:
The Shaped Hem Tunic ~
I made minimal changes to the pattern pieces. Again there is a little buggin' out going on here because I'm not use to NOT making huge changes to the pattern pieces. Here are the pattern alterations and design changes I made.
First - the back and front pattern pieces are single pieces. Two large pieces that you lay on the fabric and cut out! Of course, I couldn't leave well enough alone and I put a center back seam in the top's back.
![]()
I marked the center back, cut it from top to bottom and added 5/8" seam allowances to both pieces. I decided to go this way because I wanted to add sleeves to the top. This top with sleeves was just not slipping over my head without some assistance. I took it even further and added a 9" black invisible zipper to the neckline also.
Since I used a woven, I added a little to the center front of the top to gently glide over my abdomen and hips by simply slicing up to the waistline marking and spreading the pattern pieces.
![]()
![]()
If I make this pattern again, I'm going to cut the front apart and add space that way. If...I...ever...make...this...pattern...again! *LOL*
The Sleeve ~
The sleeve pattern from the dress was used for the top...although I still needed to make changes to the biceps...cause I haven't managed to lose any weight there! Again I started with an older sleeve pattern to make the alterations. And that's when this started to go south and head there so quickly. *sigh* I put those dayum sleeves in three times...and removed them three times. I just couldn't get them in without a multitude of wrinkles down the length of the sleeve or way too much fabric in the sleeve cap. Then I just got disgusted and threw them in the garbage. My top is sleeveless...I couldn't take any more.
Then I tried the top on and disaster...it was too tight. Peoples, annoyed was an understatement for how I felt at that point. But I put my thinking cap on and decided to add a pleather triangle on the other side of the top to match the one on the top front. BTW the pleather piece ended up on the front because I wasn't paying attention when sewing the front and back together. So I improvised ~ yet again.
![]()
Miracles of miracles this last improvisation worked...except it made a funny wrinkle on the back. Now I really was done...seriously done...turned everything off and went upstairs and read a book. Pick this up six weeks later, I've lost another five pounds, so I try on the top and mercy me, it fits. Well actually the triangle stuck out because the top was loose, so I altered where the fabric and pleather triangle met and wallah...top fits.
I know I've talked about slow sewing lately and using the best techniques BUT I just wanted this done! So I turned under all the edges at the neckline, the armholes and the hemline, topstitched, pressed and it was finished. Thank you God ~ it's no longer a wadder!
![]()
The Pants ~
I originally made the pants out of a jersey ponte during the blogging hiatus. Based upon that make, I altered the pants pattern for a better fit. To make this version I went with the currently altered pattern because I wanted to see how they'd wear in a woven fabric. Well that was wrong! Those suckers were so tight they wouldn't go over my thighs. So I decided that sewing for my new shape wasn't working and I put the pants to the side.
But once the top fit, I was inspired to figure out how to make the pants work. I decided to add a 3" pleather strip to the side of each pants leg and use 1/2" seam allowances to attach them to the pants. Since there are pleather accents on the top, I thought this would work well with the pants. This meant taking the pants apart but I was fine with that, as long as the pants became wearable.
![]()
The strip did work so I added the elastic to the waistline (more on it's application in a future post), ripped the inner leg seams and made them a little smaller, then hemmed the pants. Outfit complete.
![]()
![]()
Conclusion ~
This is not a work outfit. I've been going out a lot more after work and I would definitely wear this out and about in NYC. Also, both the top and pants are a closer fitting silhouette than I've been accustomed to wearing. Honestly, this is taking some getting use to but baggy garments lately have just made me look like I'm wearing someone else's clothes...not a good look!
Finally, I'm a huge fan of the mixed materials look in garments. I love mixing pleather with wools and pontes. I have a few ideas for a couple more garments using pleather - don't know if they will make it out of my sewing machine before spring comes - but as long as the trend continues I will be making more versions of it.
![]()
At the time I started working on the pants, I thought I would get both pieces finished prior to Christmas week, well that didn't happen! As you can see since it's the middle of February! *LOL* When I finally cut the pattern pieces out I changed a few of my original ideas for this outfit. Some were design changes and some were added after the top was a little too tight.
- I omitted the lace because the stash didn't yield up anything that wouldn't make the outfit look like eveningwear.
- I changed the fabric from black ponte to a black poly/wool crepe suiting I purchased from Fabric Mart during one of the 50% off sales. Please note this probably added to some of my challenges since the pattern clearly states that you should use a knit fabric for the pieces.
- Pleather accents were added also to the top and the pants.
- A lining was also added to both the top and pants by underlining the fashion fabric.
Here's my finished garment:

Pattern Alterations Design Changes:
The Shaped Hem Tunic ~
I made minimal changes to the pattern pieces. Again there is a little buggin' out going on here because I'm not use to NOT making huge changes to the pattern pieces. Here are the pattern alterations and design changes I made.
First - the back and front pattern pieces are single pieces. Two large pieces that you lay on the fabric and cut out! Of course, I couldn't leave well enough alone and I put a center back seam in the top's back.

I marked the center back, cut it from top to bottom and added 5/8" seam allowances to both pieces. I decided to go this way because I wanted to add sleeves to the top. This top with sleeves was just not slipping over my head without some assistance. I took it even further and added a 9" black invisible zipper to the neckline also.
Since I used a woven, I added a little to the center front of the top to gently glide over my abdomen and hips by simply slicing up to the waistline marking and spreading the pattern pieces.


If I make this pattern again, I'm going to cut the front apart and add space that way. If...I...ever...make...this...pattern...again! *LOL*
The Sleeve ~
The sleeve pattern from the dress was used for the top...although I still needed to make changes to the biceps...cause I haven't managed to lose any weight there! Again I started with an older sleeve pattern to make the alterations. And that's when this started to go south and head there so quickly. *sigh* I put those dayum sleeves in three times...and removed them three times. I just couldn't get them in without a multitude of wrinkles down the length of the sleeve or way too much fabric in the sleeve cap. Then I just got disgusted and threw them in the garbage. My top is sleeveless...I couldn't take any more.
Then I tried the top on and disaster...it was too tight. Peoples, annoyed was an understatement for how I felt at that point. But I put my thinking cap on and decided to add a pleather triangle on the other side of the top to match the one on the top front. BTW the pleather piece ended up on the front because I wasn't paying attention when sewing the front and back together. So I improvised ~ yet again.

Miracles of miracles this last improvisation worked...except it made a funny wrinkle on the back. Now I really was done...seriously done...turned everything off and went upstairs and read a book. Pick this up six weeks later, I've lost another five pounds, so I try on the top and mercy me, it fits. Well actually the triangle stuck out because the top was loose, so I altered where the fabric and pleather triangle met and wallah...top fits.
I know I've talked about slow sewing lately and using the best techniques BUT I just wanted this done! So I turned under all the edges at the neckline, the armholes and the hemline, topstitched, pressed and it was finished. Thank you God ~ it's no longer a wadder!

The Pants ~
I originally made the pants out of a jersey ponte during the blogging hiatus. Based upon that make, I altered the pants pattern for a better fit. To make this version I went with the currently altered pattern because I wanted to see how they'd wear in a woven fabric. Well that was wrong! Those suckers were so tight they wouldn't go over my thighs. So I decided that sewing for my new shape wasn't working and I put the pants to the side.
But once the top fit, I was inspired to figure out how to make the pants work. I decided to add a 3" pleather strip to the side of each pants leg and use 1/2" seam allowances to attach them to the pants. Since there are pleather accents on the top, I thought this would work well with the pants. This meant taking the pants apart but I was fine with that, as long as the pants became wearable.

The strip did work so I added the elastic to the waistline (more on it's application in a future post), ripped the inner leg seams and made them a little smaller, then hemmed the pants. Outfit complete.


Conclusion ~
This is not a work outfit. I've been going out a lot more after work and I would definitely wear this out and about in NYC. Also, both the top and pants are a closer fitting silhouette than I've been accustomed to wearing. Honestly, this is taking some getting use to but baggy garments lately have just made me look like I'm wearing someone else's clothes...not a good look!
Finally, I'm a huge fan of the mixed materials look in garments. I love mixing pleather with wools and pontes. I have a few ideas for a couple more garments using pleather - don't know if they will make it out of my sewing machine before spring comes - but as long as the trend continues I will be making more versions of it.
