Let's start out by saying I'm not a quilter. Even though I've made several "quilting" projects, they're not my top must sews. However, I love jelly rolls. The thought of them, how the fabrics play so well together, how they can become so many different things.
Whenever I see one, the possibilities of what the new yardage can be inspires me. Especially black & white jelly rolls. So while I'm not a quilter, I was inspired to buy several jelly rolls and make two yards of fabric from them to create a top.


2 packages of black & white Ankara strips purchased from Cultured Expressions. Each package had 20 strips.
1 yard of solid black cotton fabric from StyleMaker Fabrics for the strips, sleeves and back insert.
7 3/4" buttons purchased several years ago from Pacific Trimmings
1/2" black bias binding also purchased from Pacific Trimmings
First let's discuss making the fabric ~
Honestly, this was the most tedious part of the sew and took me about 4 days to complete. I whined through this part because not only was each seam sewn but they were pressed open, then flat, and serge finished.
Here's how I made it ~
1. Sorted the strips into piles.
2. Determined how I wanted the layout of the strips to look.

3. Sewed the strips together using a 1/4" seam. My sewing machine has a 1/4" foot with guide and one without a guide. Using the one with the guide was SOOOOOOO helpful!

4. After 11 strips were sewn together, I added a black strip cut in the same dimensions (2.5" x 45") to differentiate the sections.
5. When each section was sewn, I pressed the strips to the left side. Then each strip was serge finished. I did this because my yardage will be used for a garment and needs a cleanly finished inside.
6. Continued this for 3 sections to get the yardage I desired.

Once you decide how much yardage you need - I needed 2 yards to make the top front, back, front facings and sleeve bands - then you can start your garment's construction process.
Since I had all of those seams, I chose a pattern that didn't have a lot of pattern pieces. I didn't want to cut apart the fabric I'd just sewn together. So I started with Anna Allen Clothing's Anthea Blouse.
Design/Construction Changes ~
I need you to know that while this pattern goes up to a size 22, in my opinion, it's not size inclusive. The hip measurement on a size 22 is 51" way below the amount of space I need for a flowy hemline.
I made some simple pattern adjustments to get the top to fit me.
- I'm bigger on the bottom than the top. So the shoulders and bustline on the size 22 fit with no problem. My challenge is my abdomen and waist.
- I also had no challenges with the sleeves since the design is for very wide sleeves.
- On the front pattern piece I did a slice and spread from the abdomen to the hemline - spreading the pattern 1" at the hemline.
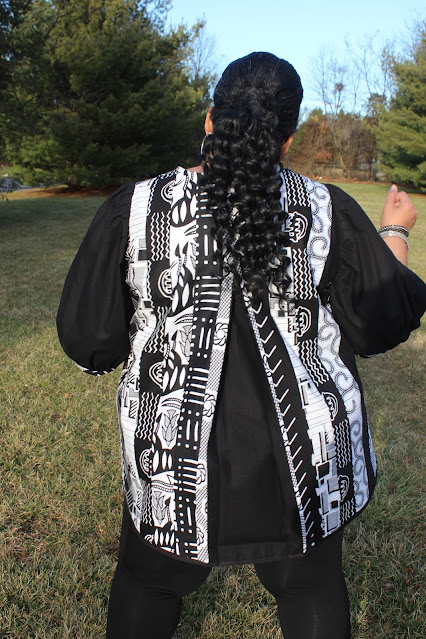
- To add width to the back, I went with a design technique to get the necessary width. Especially since I needed to go from 51" to 65" at the hemline (this includes ease for wearing).
- I added an 8" insert to the back that when opened, gave me more than enough space in the abdomen and hip area.
- The back pattern piece says to cut on fold. I cut them as single pieces adding 1/2" seam allowance to both.
- Then the insert was sewn to either side of the back pieces using a 1/4" seam allowance.
- I chose a point about 6" down the back and stitched the original two back pattern pieces together using a 1/4" seam allowance.
- Press flat and open and walah, extra width and cool design feature.
- The last design feature was to cut the sleeves from the solid black fabric and the sleeve bands from the jelly roll fabric.
- I did lengthen the blouse by 3" because my comfort level is that everything adequately covers my abdomen and backside.
- I didn't want topstitching to show on my blouse front. So I hand stitched the bias binding down and didn't include topstitching on the front facings.
- The pattern tells you to double roll the hem and topstitch it down. I used a bias binding to finish the hemline because the bulk in double rolling the hemline would have distracted from the finished look.
I have this thing about "corralling" patterns so your eye has a place to rest. I think it makes the finished garment more appealing to the eye. That is why I used the black sleeves, black strips, and black back insert.
Here are a few pictures ~


